Monday, October 22, 2012

GameCenter Turn Based Matches


We have been looking and doing a major overall to Euchre HD.  In particular, we are looking at
leveraging GameCenter's turn based games.  Right now we use basic Game Center matchs, but there lots of good benefits with being able to leverage the turn based capabilities.  The two big benefits we want are:

  • Support for "live" and "non-live" matches (turn based)
  • Support for Timeouts
  • Improved Game Center match UI

A really good example to get started with Game Center Turn Based match's is Beginning Turn-Based Gaming with iOS 5 by Jacob Gundersen.  Some API's have been changed in iOS 6, but it is still a really good tutorial.

This was my first real experience working with the Turn Based API, and I wish I would have know the following going into the project.

Passing Turn To Yourself

It turns out that a match participant may "pass" the turn (baton) to themselves.  I had assumed that wouldn't be allowed, but it turns out the API does allow it, and it definitely simplified some of my game play logic.

The only catch is that other players won't be notified of the changes to the Game State when you pass the game baton to yourself.

Participant Timeout (new in iOS 6)

I thought that when a player timed out their participant matchOutcome would get set to GKTurnBasedMatchOutcomeTimeExpired.  However, it turns out you have to determine this condition yourself and set the appropriate matchOutcome for the participant.

Another interesting case is when a participant is in a matching state.  The timeout isn't applied against that unmatched participant.

Changes to Authentication

iOS 6 depreciated the old authenticateWithCompletionHandler and replaced it with GKLocalPlayer.localPlayer.authenticateHandler. They changed the block callback a bit, but other then that it looked equivalent. However, the authenticateHandler in iOS 6 won't present the login view if the user cancels it. I realize game center will auto lockout an app after 3 cancel attempts, but I'm talking about just 2 attempts. If they cancel the login, they have to leave the app and come back before Game Center will present the login even through the authenticateHandler is getting set again. I was able to workaround the issue by continuing to use the depreciated authenticateWithCompletionHandler.

The reason this is important for Euchre HD is that it requires Game Center for multi-player. The app tries to authenticate to game center on launch, but if the user cancels we don't ask them at launch again so they won't get nagged. What we do is show a Game Center Login button if they aren't logged in when they select multi-player.

Number of Players in a Match (Updated 11/1/2012)

One problem we have found is that if you have a variable number of players and then start a match with "auto-match", Game Center will start the match with the "minimum" number of players.  It does this even if the Game Center match-making UI is showing auto-match spaces for more then the minimum number of players.

Let me try and explain this a bit better. One thing we do in Euchre HD is to allow people to pick the number of human players they want in a match.  They can pick from 2 to 4 humans.  Euchre is of course a 4 person game, but we fill in the remaining spots with computer players.

Game Center provides a really nice interface for forming a multi-player game.  Here is an example, that shows a 2-4 player game.


The play can add or remove players players as long as they stay within the defined min/max limits.


However, if the player selects "Play Now" and "Auto-match" is selected a match will only be formed with the minimum number of players.  In the above example, even through 3 players are being shown as Auto-match, Game Center will only start a 2 player match.

Here is the example code showing how the request is created.

    GKMatchRequest *request = [[GKMatchRequest alloc] init];
    request.minPlayers = 2;   
    request.maxPlayers = 4;
    request.playersToInvite = playersToInvite;
    request.playerGroup = 0;
    request.defaultNumberOfPlayers = 4;
As anyone else encounter this issues?  Any good suggestions on how to handle it?  I would rather not write my own custom matchmaking interface.


Conclusion

Overall, turn based Game Center is a huge help in building multi-player games.  I was still surprised about how many special cases have to be handled and how much testing is needed.  I guess multi-player is just hard.  :)

Please feel free to follow me on twitter at @fivelakesstudio. I would love to hear about your experiences Game Center.  I hope this was helpful.

Thanks for reading and be sure to visit us at Five Lakes Studio.


Friday, August 31, 2012

NSMutableArray Weak References


I had the need to store non-retained objects to prevent a retain lock loop.  I found a couple of different ways to do this.  I started by trying to implement a derived version of NSMutableArray.  There is a nice example by Mike Ash on how to do implement a NSMutableArray.  It would be fairly easy to modify his example to remove the retain/release pieces.  However, I was a bit nervous when it came to testing the code and my changes.  While he has a test in place, the test wouldn't work if the objects weren't retained.

So I kept looking and found a great example on Stack Overflow by Mark Powell that takes advantage of Core Foundation's Mutable array.


I haven't done much with Core Foundation services, but I have to say that it's amazing how easy this was to do.  I modified the example above to work with ARC so there is a __bridge cast for the returned CGArrayCreateMutable. I put this along with my changes in a small class and header file which can be downloaded at Download NSArrayWeakReference Source.

I hope you found this helpful.

- Tod

Monday, August 27, 2012

Japanese App Store Withholding

I learned an interesting lesson this weekend.  I was reviewing our AppStore financial results and I noticed an interesting entry:


After a little bit of research, I learned Apple withholds a 20% tax on Japanese sales.  In order to eliminate this tax, you need to file some tax forms with the Japanese government and US government.   Apple helps with this process by providing and submitting the forms.

David Smith has a nice article on "Understanding Japanese App Store Withholding" that goes into more detail.

I filled out the forms this weekend (8/26/2012), and I will report back on when it takes effect.  I would love to hear about year experiences with this process.


Monday, August 13, 2012

Subversion to Git

A couple weeks ago Ken and I decided to make the plunge from Subversion to Git.  The main catalyst for this was some Hype generated files I wanted to check into Subversion.  Unfortunately, every time you generate the HTML for a Hype project it blows away the folder structure, which removes the .svn folder and gets subversion all confused.  I understand there are newer versions of Subversion that resolve that issue, but I decided to just do the switchover to Git given that's where it seems most people are going today.

Picking a Hosting Provider


Given Ken and I work together on projects we need a version control hosting provider. We currently use Beanstalk for subversion, and we have been very pleased with them.  However, I decided to take a look at the available options.  I took a serious look at GitHub and Bitbucket.  I opted to go with GibHub for our main git repository.  I really liked its interface and how it links your personal account to your corporate account.  Plus it has a big user following.  Several reviews I read also talked about GitHub being more performant and a step ahead of Bitbucket.  However, that info could be a bit dated by now.

We opted for GitHub's $25 per month plan for 10 private repositories.  However, I also created a Bitbucket account as they have free unlimited private repositories.  I'm using bitbucket to host paid for 3rd party assets, and I'm using GitHub for our source.

GUI Tools


While lots of people use the command line to manage Git, I prefer having some nice GUI tools for my day to day work.  There are several tools out there, but I ended up going with SourceTree.  It seems to be the most complete tool for managing subversion repositories.  I also used GitHub's tool for awhile to get up and started, but SourceTree feels like a more complete and powerful solution.

Migration


I decided not to do a full history migration from Subversion to Git.  I opted to just migrate the latest revision.  We are a small shop, and it sounded like more trouble then it was worth to preserve the entire history.

I still made a big mistake though.  I just took all our source and added it to Git, just like it was setup in subversion.  We have over 1.5 GB of source including game assets such as images, sounds, and puzzle data.  This is when I learned that GitHub doesn't recommend repositories over 1GB.

I learned firsthand how painfully slow it was to pull down a new large repository, and I was also worried that we would get flagged by GitHub for having too large of a repository.  I also found I would occasionally get an error downloading the new repository and would have to start over.

The solution was to breakup the old subversion repository into several smaller repositories and submodules.  I haven't had any issues with these smaller repositories.

Submodules


I decided to break up the old single subversion repository into several smaller repositories.  Each iOS app we make has its own GIT repository, and we use submobiles for shared components.


This is an example of the submodules used for Hashi, a new App we are working on.


What's nice about using submodules is that the parent project references an explicit revision of the submodule.  So if a submodule is updated in a different project, it won't break the current project.  This allows you the time to upgrade the project at your own connivence.

One thing we learned is that you have to be a little careful when adding a submodule to your project through SourceTree.  By default SourceTree was adding the user's login to the submodules URL. This of course causes issues for other people trying to work with the submodule.


You just need to remove the user's login from the URL.  If you forget, you can manually change the .git/config to reference the correct submodule URL.

Conclusion


It took me a weekend or two before I started to understand Git.  I'm still far from an expert, but I am getting more comfortable with it.  One of the sites that really helped was from Mark Lodato and his Visual Git Reference.  Stuart Ellis also has a really nice basic getting started guide to using Git.  And finally the must read Git Reference on Branching and Merging.

Please feel free to follow me on twitter at @fivelakesstudio. I would love to hear about your experiences on using or switching to Git. Let me know if you found this useful.

Thanks for reading and be sure to visit us at Five Lakes Studio.


Monday, July 2, 2012

Hype - How To Play

Ken and I have been struggling with the problem of how to teach people to play our games.  Most of our games are fairly niche, and we would like to broaden their appeal to people who might not know how to play.

We wanted something that would accomplish the following goals:

  • Quickly teach the players the basics of game play
  • Look integrated into the app
  • No download or streamed content
  • Measurable
  • We don't want to inflate the App size too much
  • Something we can create without too much custom programming

What we ended up with was a how to play integrated tutorial that was implemented with an imbedded WebView that plays back HTML 5 generated via Hype.  That was a mouth full.  Good thing we have a video showing it in action:


Hype


Using Hype, you can create HTML 5 web content with animations and interactive content.  The best part is it creates really small output as it just requires the art assets and some generated javascript to control the animations.


There are just a view basic types of object you can use in Hype such as Box, Text, Button, ...


I wish Hype had Arrows and other nicer callout objects build into it.  However between the art assets I already had and using Snagit for the other assets, I was able to put together what I needed.

I was actually able to simulate gameplay just by using these basic Hype elements and its Key framing capability.  It only took one evening to finish the Hype project.  I thought about using something like Camtasia to record a video of some of these parts as opposed to rolling the play animations by hand.  However, I wanted the output really small and it wasn't that hard to simulate the effects I needed.  However, given you can embed video in Hype it would be interesting to try it with embedded video clips.

HTML


You can easily generate the HTML assets for the Hype project.  It just produces a simple "main" html file and a folder containing the Javascript, Images, and other resources needed to run the project.

Given this is just HTML, you can even upload it to a website and interact with it directly in a browser:


We just took these generated assets and added them to our iOS project so they would be built into the resource bundle.  If you do add it to your project, be sure to include it as a folder reference so xcode will preserve the folder layout in the resource folder.  Otherwise, it will get flattened into a single folder which could cause issues.

Loading WebView From Resource


You load resource based files into the WebView just like you would load any local file.  Here is some example code that loads the above example:

    NSString     *howToPlayDevice = [FLUtil iPad] ? @"iPad" : @"";
    NSString     *resourcePath    = [[NSBundle mainBundle] resourcePath];
    NSString     *howToPlayPath   = [NSString stringWithFormat:@"%@/html/HowToPlay%@.html",
                                               resourcePath, howToPlayDevice];
    NSURL        *url             = [NSURL fileURLWithPath:howToPlayPath];
    NSURLRequest *requestObj      = [NSURLRequest requestWithURL:url];
    [self.howToPlayWebView loadRequest:requestObj];

One final tip, make sure the canvas in Hype is the same size as the WebView so it fits perfectly with no scaling or borders. That's all there is to it.  

Measurable


One of the requirements was for us to be able to measure the effectiveness of this effort through Flurry.  In order to do that, we need to be able to communicate from the HTML Webview into the Objective-C code.  

Alexandre Poirot has a nice article on How to Properly Call ObjectiveC From Javascript.  I didn't need to use his entire framework, but I used the basic concept to allow Hype's Javascript to be intercepted by the WebView's delegate.

In Hype, I setup a Javascript function to post to a special URL that can be intercepted by the shouldStartLoadWithRequest UIWebView delegate.  


I used a custom URL scheme called "howtoplayscene" and passed Hype's current scene name so I can tell what scene the user is viewing.  By doing this in an iframe that we create and then destroy it so the user doesn't see anything.  Plus, we can use the same HTML for the embedded WebView as well as a regular browser.  Although, there won't be any tracking when running in a regular browser.

Once the javascript is in place, each scene can then be configured to call the trackHowToPlayCreentScene function when it's loaded:


That's all there is to it on the Javascript side.   The Objective-C side is fairly straightforward:


With this in place, we will get custom events in Fluury that look something like:
  • HowToPlay.Scene.Goal
  • HowToPlay.Scene.Tool Bar
  • Show HowToPlay.Scene.Step 1
  • Show HowToPlay.Scene.Step 2
We will be able to track how many users make it through all they steps and which percentage of users drop off at any given point in time.  Hopefully, with this information we can help make the tutorial better and find where and if users are getting stuck.  We will also be able to correlate information such as the percentage of people that complete the tutorial that go on to purchase.

The other little trick I use, as seen above, is when the user complets the How To Play tutorial.  I have the HTML navigate to "http://www.fivelakesstudio.com/Five_Lakes_Studio/PicrossHD.html".  I picked that URL so when the user hits the done button they will be taken to the webpage for PicrossHD, when run from an external browser.  However, when run from within the App, we close the UIWebView.

Conclusion


This will go live soon, and we are excited to get this in the hands of our new users. I hope we can teach more people how to Play Picross HD and hopefully they will like it.

Please feel free to follow me on twitter at @fivelakesstudio. I would love to hear about your experiences on how to onboard people to your app. Let me know if you found this useful, and especially if you now understand how to play Picross HD.

Thanks for reading and be sure to visit us at Five Lakes Studio. I should mention that I also work for Techsmith, the makers of Snagit and Camtasia.

Monday, June 18, 2012

Engage Users In-App

Ken and I have been trying to figure out how to better engage and communicate with our users.   The AppStore sure doesn't make it easy.

We have tried to use GetSatisifaction and of course there is classic e-mail, but they both have the problem of discoverability.  We don't have a good spot in App to make those resources available without disrupting the user experience.  By forcing users to leave the app and visit our website to communicate with us, we averaged only a few contacts a month.

We also prompt for star ratings within the app and that has been helpful in getting reviews, and we appreciate and read the review feedback.  However, it's really frustrating when you can answer the persons question or problem with no way to actually get the answer to them.

I happened to find a nice solution to this problem.  The Appsfire App Booster SDK for iOS and Android is designed to help with in-app engagement.  It's still in Beta, but we have been using it for Picross HD, and its been great.  We now receive feedback a couple times a day from our users, and we are able to respond back to them directly.


Getting Started

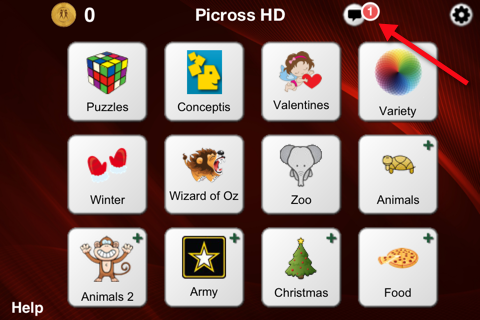
First off, we carved out a little space in the UI to put in a messaging button and indicator.  Appsfire has several recommendations for this so it has enough visibility within your app.  We chose to put it at the top of our main puzzle screen to the right of our App name:

Message Button With Message Badge
They even include a little helper class that takes care of creating the badge for you.  We chose to do a custom integration because we have a game style UI.

We hooked up notifications for message changes so that badge can be updated correctly, and when the little message bubble is pressed we launch the Appsfire messaging interface.  That's all you have to do on the client side and you can start engaging your users.  I would be happy to share the code we use for this, just send me a tweet.

In-App Messaging

Appsfire includes a built-in messaging engine.  Your users can send you messages, and you can reply to them directly within the app.  


They have options for changing the color scheme, but the default color scheme worked well for us.

The UI is also supposed to be localized in several languages including German and Japanese.  However, we were have never able to confirm that it is indeed localized.  I can say that we have many Japanese users that have sent us feedback through Appsfire.


The e-mail field is optional.  We have found most users do provide an e-mail address.  When the feedback is sent, you will get an e-mail that allows you to respond either within the app or via an e-mail (assuming the user provided an e-mail address).


We usually try to answer the user via the "Notification Wall" aka in-app.  However, if the response is long or under special circumstances we will reply via e-mail.  For example, one user felt strongly about an issue and vowed to never launch the app again.  I wanted to thank the user for their feedback and reach out to them.  Doing it in-app wouldn't have been effective assuming they weren't going to open the app again so I used e-mail.  The user thanked me for reaching out to him and hopefully he gave us another chance.

What's New

Another feature we use is What's New.  The Appsfire server will automatically detect new App releases, and it can automatically notify your users of the update.


Tips and Tricks

We are planning to release a series of tips and tricks for our users.   So far we have released one tip, and it has been well received.  The Appsfire portal provides metrics on views and clicks for each message so you can measure their effectiveness.

We think this is a great way to expose users to features or capabilities of our app that they may not know about.   When creating custom message you can also specify the message in different languages such as German and Japanese.

Link to Web Content

In additional to static message, you can link to web content either displayed within the app or via the Safari app (on iOS).  We use this for inviting people to join your twitter account and are experimenting with other creative uses such as linking to a youtube help video.


App Promotion

App promotion is another option available via the Appsfire SDK.  We use it in Picross HD to promote Kento and vice-versa.


When the user clicks on an App promotion message they are taken directly to the AppStore.

Badge Updates on Launch Pad

A new feature they just added was the ability to update the badge on the Launch Pad without having to run the App.  This is a great way to help pull people back into the app.


Conclusion

I highly recommend the Appsfire App Booster SDK, and it is in Beta!!  It still has some rough edges, but even in its Beta form I consider it a must have for Picross HD because of how it allows us to connect with our customers and create a more engaging experience.  


Here are some of the improvements I hope they make as they continue to develop the SDK
  • The web portal for managing messages is a little rough around the edges.  
    • Setting the start and end dates for a message didn't work as expected.
    • It was challenging getting push badge notification to work and needed Appsfire support.  I expect this will get better.  It desperately needs debug tools.
    • Doesn't work behind some firewalls
  • The in-app messaging interface doesn't work behind some firewalls
  • Feature Request:  Only the welcome message allows you to provide "longer" text without having to use a web page.  It would be nice for tips and tricks to have a custom message with longer text.
  • Feature Request: I would love the ability to time message deliver based on days since installing the app (or other in-app usage).  Right now all messages are date/time delivered.

The team over at Appsfire is very professional and helpful, and I can't say enough nice things about them and their offering.

Please feel free to follow me on twitter at @fivelakesstudio.  I would love to hear about your experiences connecting and engaging with your users.    Let me know if you found this useful.

Thanks for reading and be sure to visit us at Five Lakes Studio.

- Tod

Wednesday, June 6, 2012

AB Testing - Results

In Part 1 I talked about how we are adding interstitial ads into Picross HD. We had been getting tips and suggestions on how to do this in a way that doesn't drive our users crazy.  We decided to put together an AB Testing framework so we could learn from the results, and this is the results of that experiment.

Interstitial Ad Providers Test

One of the tests we conducted was on interstitial Ad providers.  We went with 2 different providers: ChartBoost and PlayHaven.  These ads are displayed on launch of the application and half our users got ChartBoost and the other half got PlayHaven ads.

Ads Shown
Even though ChartBoost showed only 2% more ads, it generated 8% more clicks.

Ad Clicks
In addition, it turns out ChartBoost also produced significantly more revenue.


I plan on continuing to work with PlayHaven to see if we can improve the results.  They have been great to work with, and I think they can do better.

The spike on the 29th was caused by two things at once.  The first was a one day promotion on AppsFire, and the second was we become more agressive on showing ads.

Agressive, Normal, or Lax Ads

Another experiment we wanted to run was to determine how often we should show ads.   We really didn't want to piss off our customers, and we weren't sure what the reaction would be. It's rather difficult introducing ads into a product that didn't have any ads to begin with.

We tested 3 different configurations: Agressive, Lax, and Normal.  Each configuration had about the same level of distribution.


"Time Between Shows" is the minimum time that has to pass before we show another ad.  For example, the agressive configuration won't show ads more then once every 5 minutes.  In the Lax case, we where only showing an ad every day.

We also didn't want the user's first experience in launching the app to be an ad.  So we used a "Sessions Before Active" configuration.  In the case of agressive, we require the app to have 2 sessions before showing an ad.

We then looked to see what effects this had on our app usage.  The Lax time was the closet measure we had to no ads, and it basically matched what we had seen before introducing ads.

Time in App with Lax Ad 

Our takeaway was that we weren't seeing a significant shift or loss of time spend in app.  Actually, you could argue the time spent in app actually improved a little bit.   


Time in App with Normal Ad 
We also found it interesting that there was no significant difference between Normal and Lax ads.

Time in App with Agressive Ad

Our AB Test framework allows us to adjust tests daily.  Using that capability, we pulled the Lax ads configuration on May 29th, and we may soon go to just showing Agressive Ads.  The one thing holding us back is sessions end almost 50% of the time after seeing an interstitial add!!


This is a bit concerning to us as we only do an InterstitialShow when a session starts. That means almost half our users are exiting the app right after they started the app.  Unfortunately, flurry doesn't let us track this by event so I can't tell how it compares across ad vendors.  I'm still not exactly sure what this really means for the app's performance as I haven't see it negatively effect the number of sessions or time spent in app.

Ad Feedback

We have had several negative responses to the ads.  However, it hasn't negatively effected our overall star rating or time spent in app.   Some of the complaints we received include:
  • Too easy to miss click on the ad
  • Video Ad consuming download bandwidth not appreciated (we also use AdColony for video ads).
  • Ads being introduced in a paid for app.  Picross HD use to be a paid app a long time ago.
That last one was interesting because we don't show ANY still ads if any puzzle pack has been purchased, and we never show ads in the paid puzzle packs.  However, we show video ads in the "free" puzzle packs.   We are going to change this so that if any puzzle pack has been purchased we won't show any ads.  I think it was just too confusing for users the other way.

Conclusion

This has been an exciting experiment.  The data is telling us we should just go with agressive ads and use ChartBoost as our ad provider.  I'm still not comfortable pulling the agressive switch as I want to hear from more customers, and PlayHaven has been such a good group of people to work with I would like to see if they can perform better.

If we can make this model work, we would like to add more ad supported content in Picross HD.

Please feel free to follow me on twitter at @fivelakesstudio.  I would love to hear about your experiences with ads and A/B Testing.  Also feel free to contact me if you would be interesting in finding out more about our iOS AB Test framework.  

Thanks for reading and be sure to visit us at Five Lakes Studio.

Monday, May 21, 2012

Mobile Website (dudamobile.com)

OMG.  Five Lakes Studio is a mobile casual game company, but we had no mobile website.  What's even worse is a majority of our traffic is coming from mobile devices (surprise!!!):


How did we get here?

We don't get much traffic to our website, and we don't want to spend a lot of time on it.  We focus our business on our users and our apps.  For example, we just integrated AppsFire's AppBooster SDK into Picross HD so users can contact us and we can communicate with them directly within the App.  I plan on writing a blog post just about it.  So far the results are looking promising.  However, you have to have a website.

While we could hand code HTML, we ended up using iWeb.  Our pages are mostly static, and we wanted something that was fast to create and gives us creative control (not ridged templates).  When we first launched Euchre HD we had some user complaints because they didn't understand how to setup Game Center.  I was able to quickly (minutes) create and post visual step by step instructions on how to do this by using iWeb and Snagit.    

The downside with iWeb is it doesn't help with the creation of a mobile website, and the HTML produced isn't well suited for mobile.  Also, I'm not sure what the future of iWeb is going to be.  I think it is an amazing tool and I wish Apple was doing more with it.

What are we to do?

I started searching for a mobile website creation tool.  I ended up finding an interesting online/hosted solution from dudamobile.com.  They have an ad supported model and a paid model  ($9.00/month).  The paid model also supports connecting to your domain so now we have m.fivelakesstudio.com.


Getting Started

Its very easy to get started.   Dudamobile walks you through setting up a new site.  You can pick from several themes.  The nice thing is you aren't locked into a theme.  During editing you can customize the page headers, footers, background, colors, layout, and so much more.

You can interact directly with a preview of a page and choose from many highly customizable interesting drag and drop widgets:


My favorite widget is the Image Slider.  You can add up to 3 images in a slider style control.  You can see it above in the preview (currently showing Kento).  

Page Import and Syncing

One of the nice things about dudamobile is that it can import and sync to your existing website.  When you add a page, you can give it the URL to one of your existing pages.  It will then important the page. I was surprised this even worked for iWeb sites.  I did have to do some basic cleanup and reformatting on the imported content.  It was mostly deleting extra stuff I didn't want in the mobile site.

I haven't tried syncing content.  Most of the content we have is fairly static so I turned it off.  Plus I am doubtful syncing will work well with iWeb, but I might be surprised again.

Support

I was impressed with the dudamobile support staff.  I had some issues getting the slider to work the way I wanted.  They where very responsive and helpful.

Conclusion

It has only been live for about a week and so far I am pleased with how this turned out.   I still need to setup redirects on all the web pages to redirect to the mobile website.  Currently, only the main page has a redirect.

Please feel free to follow me on twitter at @fivelakesstudio.  I would love to hear how others have solved their mobile website needs.

I hope this was useful.  Please visit our site and try out our games for iOS.

Tuesday, May 8, 2012

ABTesting

We are looking at adding interstitial ads into Picross HD.  We have been talking to people on the subject trying to get tips and suggestions on how to do this in a way that doesn't drive our users crazy and yet allows us to gain some additional revenue that we can use to keep making our games better.

One point that kept being made was to use AB Testing for figuring out how to optimize what we are trying to do.  This of course can be applied to many more things then ads, but I finally had a real need to solve this ABTesting problem.

The Problem

I wanted a simple ABTesting platform that would allow me to do the following:

  1. Test different variables
  2. Change variables without have to republish the App
  3. Track / Report on the results

Variables


We use a simple XML file to define the test cases we want to experiment with.  Here is a simple example of the XML definition we use:

<ABTest>
   <testset name="AdTime">
      <casedef name="Normal" weight="33"/>
      <casedef name="Agressive" weight="33"/>
      <casedef name="Lax" weight="33"/>

      <vardef key="minTimeBetweenInterstitials">
         <case name="Normal" value="10.0"/>
         <case name="Agressive" value="5.0"/>
         <case name="Lax" value="1440"/>
      </vardef>

      <vardef key="numStartsBeforeShowingInterstitials">
         <case name="Normal" value="4"/>
         <case name="Agressive" value="2"/>
         <case name="Lax" value="10"/>
      </vardef>
   </testset>
</ABTest>


This was developed so that we could have multiple test sets and run multiple ABTests at the same time. The example above just defines a single test set.

With a test set, we can define multiple test cases we want to evaluate and we can define a frequency or weighting used to determine the percentage of users/devices that should be assigned that test case. In addition, each test set can have multiple variables and each variable can have values for each test case.

We wrote a simple objective-c class that manages the loading of the XML and provides a simple interface for reading variables from the ABTest.
   @interface FLABTestManager : NSObject
   + (FLABTestManager *)defaultManager;
   - (void)activateABTest;
   - (NSString *)stringForKey:(NSString *)key 
             withDefaultValue:(NSString *)defaultValue;
   - (int)intForKey:(NSString *)key withDefaultValue:(int)value;
   - (float)floatForKey:(NSString *)key withDefaultValue:(float)value;
   - (bool)boolForKey:(NSString *)key withDefaultValue:(bool)value;
   @end


The XML file is included as a project resource and then within the apps delegate method applicationDidBecomeActive you call activeABTest:
   - (void)applicationDidBecomeActive:(UIApplication *)application
   {
      ..
      [[FLABTestManager defaultManager] activateABTest];
      ..
   }

Once activated, the App will randomly pick a test case by weight for each test set defined.  It should be noted that once picked, the app will keep using the same test case even if the app quits.  This effectively locks a device into a particular test.  If the app is uninstalled and reinstalled a new test case may get chosen.

We choose to only activate the test cases from within applicationDidBecomeActive so we only activate once per session.  This is because it is possible to have a different configuration chosen during activation (see Changing Tests) and for reporting/tracking purposes we don't want to mix test cases (see Tracking/Reporting).

In order to read a variable under test, simple accessors methods are provided.  For example: If we where configured for Agressive Ad display and we had the XML definition above then the variable minTimeBetweenInterstitials would return "5.0":
[[FLABTestManager defaultManager] floatForKey:@"minTimeBetweenInterstitials"
                             withDefaultValue:@"10.0"];

We supply a default value for the case when the test hasn't been activated or if there was a problem determining the value.

Changing Tests


We wanted the ability to change tests without having to republish the App. This allows us to refine settings as we learn. In order to do this, a copy of the XML is stored and retrieved via a GoogleAppEngine service.

When an app doesn't have an AB Test loaded, it just uses the built in XML definition and a request is made to the web service for an updated version.  If there is an updated version, it will be downloaded and kept ready for the next ABTest activation.

When a new, downloaded, version of the ABTests are found the app will adjust to the new values accordingly.  For example if the apps current test case is no longer available in the XML definition, it will just pick a new test case.

Tracking / Reporting


Whenever activateABTest is called we log events to Flurry for the active test cases.  For example if the above XML definition is used and the device chooses Agressive for AdTime then the following two events would be logged:

   AdTime <== with parameter of Agressive
   AdTime.Agressive

This is enough information to allow us to create a segmentation on "AdTime.Agressive" so we can see how it compares with other tests.  We also log "AdTime" as an event by itself with the parameter set to the test case picked so we can validate the distribution of test cases.

Conclusion


We are still finishing testing on this new framework and we hope to submit to the AppStore next week. I think this has some nice potential to allow us to do more ABTesting on the work we do in order to improve the user experience of our products.  I will report back on our findings.

If you would be interesting in using this framework, just let me know.  I can't really hook you up with the GoogleAppEngine side of things, but I would be happy to share what I can on the iOS side.

Please feel free to follow me on twitter at @fivelakesstudio.  I would love to hear how others have solved this AB Testing issue.

I hope this was useful.  Please try out Picross HD and our other puzzle games for iOS.


Monday, April 9, 2012

Push Notifications and Urban Airship

I have been considering putting Push Notifications into Picross HD for some time now.  This weekend, I decided to take the plunge and give it a try.  I will try to cover some of the hiccups and things that I have been trying.

Why Push Notifications

Ken and I aren't very good at the marketing side of things, but everyone I talk with about marketing asks if we use push notifications.  I finally decided there must be something to this so let's give it a try.

There are a couple of uses for push notifications that I would like to try:
  1. Notify Picross HD users of new puzzle packs being available.  We plan on releasing one new puzzle pack a month, and we would like to notify users when they are available.
  2. Notify users about our other puzzle games.  This one makes me a bit nervous as I don't wont to spam our users, but I also think many Picross HD users would also enjoy some of our other puzzle games.  I'm figuring to give it a try and see what kind of response we get.
I would be interested in hearing what you use push notifications for or what you like or dislike about push notification uses.

Urban Airship

One thing about push notifications is that you need a service to bridge between you and Apple's push notifications servers.  I considered setting up my own server for this, but I decided to go with Urban Airship for now.  For the level of service I need, their service would be "free" and seemed to be the easiest way to get started with Push Notifications.

Getting Started

Urban Airship has a good getting started guide for push notification.  However, I do have a couple of tips.
Tip 1:  You will need to regenerate your provisioning profiles after you enable push notifications for your existing App Id.  If you don't, you will get an error when trying to registerForRemoteNotificationTypes as the provisioning profiles needs to be configured for push notifications.
Tip 2: The getting started guide walks through the steps of using a AirshipConfig.plist to switch between production and development for the notification servers.  I don't like this technique as it is too error prone.  It's too easy to forget how you have it configured.  They suggest using build scripts to manipulate this file, but I don't like that from a maintenance perspective plus I didn't find a quick example of how to do this.  Fortunately, you can do this programmatically instead of using the AirshipConfig.plist.  Here is an example of how taken from the Urban Airship forums (but modified a bit by me). 

- (void)setupUrbanAirshipPushNotificationsWithLaunchOptions:(NSDictionary *)launchOptions
{
    // Set passed in launch options
    NSMutableDictionary *takeOffOptions = [[NSMutableDictionary alloc] init];
    [takeOffOptions setValue:launchOptions forKey:UAirshipTakeOffOptionsLaunchOptionsKey];

    // Create and set dictionary for AirshipConfig values
    NSMutableDictionary *airshipConfigOptions = [[NSMutableDictionary alloc] init];
    [takeOffOptions setValue:airshipConfigOptions forKey:UAirshipTakeOffOptionsAirshipConfigKey];

    [airshipConfigOptions setValue:@"Application Key" forKey:@"DEVELOPMENT_APP_KEY"];
    [airshipConfigOptions setValue:@"Application Secret" forKey:@"DEVELOPMENT_APP_SECRET"];
    
    [airshipConfigOptions setValue:@"Application Key" forKey:@"PRODUCTION_APP_KEY"];
    [airshipConfigOptions setValue:@"Application Secret" forKey:@"PRODUCTION_APP_SECRET"];

    [UAirship setLogging:YES];

    #ifdef PRODUCTION_PUSH_NOTIFICATIONS
        [airshipConfigOptions setValue:@"YES" forKey:@"APP_STORE_OR_AD_HOC_BUILD"];
    #else
        #warning PUSH NOTIFICATIONS SET TO DEVELOPMENT
        [airshipConfigOptions setValue:@"NO" forKey:@"APP_STORE_OR_AD_HOC_BUILD"];
    #endif
    
    
    [UAirship takeOff:takeOffOptions];
    
    [[UAPush shared] setDelegate:self];
    [[UAPush shared] resetBadge];   //zero badge on startup
    [[UAPush shared] registerForRemoteNotificationTypes:(UIRemoteNotificationTypeBadge |
                                                         UIRemoteNotificationTypeSound |
                                                         UIRemoteNotificationTypeAlert)];
} 

This can be called from within application:didFinishLaunchingWithOptions.
Tip 3: In order to test notifications you can use the command line utility curl.  However, I ended up using an app called RESTed available on the Mac App Store.  Its UI could be a bit better, but I was able to edit the Push payload easier in RESTed then trying to do it on the command line.  I also found that with curl the payload didn't like being split on multiple lines using line continuations.
Tip 4: Add the application:didFailToRegisterForRemoteNotificationsWithError to your app delegate.  The guide doesn't instruct you to do this, but if something goes wrong during device registration, its very handle to have this method log the error information.

Processing Push Notifications

When processing push notifications it's up to the App to figure out what to do with the notifications (including showing them).  The UAPush class from Urban Airship helps manage push notifications by handling things like badges and parsing of push notifications.   Setting up UAPush is easy, as you can see in the example code above.

In order for UAPush to parse the notifications, you need to pass them to UAPush via its handleNotification:applicationState method.


This was taken from example code for the UAPush.  However, I modified it to remove the applicationState check.   application:didReceiveRemoteNotification can be called before the application has been made active.  However, I still want to display an alert even if we are becoming active.  From what I can tell the method only gets called while the application is being "launch" or "restored", it doesn't get called while the app is backgrounded.  However, if handleNotification:applicationState is called with an inactive state, it won't call its delegate parsing methods.  Which isn't what I wanted.  I want the App to display a notification if the notification is clicked on outside the app.

I still looking into understanding the implications of this, but I think for my purposes (of displaying an alert) it is fine.

Localization Implications

Picross HD is localized into 5 languages so when sending notifications, I would like them to be localized.  However, I haven't figured out how to send a localized push alert  (see "loc-key") without having the text pre-localized and stored in the application's Localizable.strings file(s).

While you can send custom push notifications that are localized, iOS won't know how to display them.  For notifications within the App that isn't an issue because the App has control of that, but when the app is in a background iOS can only display "toast" messages for types it knows about such as alerts.

This means you have to predetermine the messages you might want to send if you want them localized.  You can also supply message arguments to fill in placeholders in the message such as %@.  However, I don't believe the arguments are localized.

Conclusion

I'm still working on the implementation and trying to figure out the types of messages and workflows I want to do.  For example, if I do an announcement of a new puzzle pack some people may be on the old version that doesn't have that puzzle pack available and some may be on the new version that has the new puzzle pack.  In the first case, I may want to provide an option for the use to update to the latest version, in the later case I may want to take them to the new puzzle pack so they can try it out.

I hope this was useful.  Please try out Picross HD and our other puzzle games for iOS.

- Tod

Monday, March 26, 2012

Picross HD Localization - Part II

At a Mobile Mondays meeting in Ann Arbor, Michael Antaran founder of Marvel Apps, was talking about the benefits of localizing AppStore Apps.  That was enough to inspire me to give it a try.

In the first part, I explained that we decided to localize Picross HD into three languages: German, French, and Japanese along with some of the lessons we had learned.  Now that the localized versions have been in the AppStore for about a month, I thought it would be good to share the results along with some other interesting tidbits we learned.

German & French

We didn't see any positive impact to new user growth for localizing in German.


We did see a short term spike in new users for the French version, but after a few days it returned to its normal trends.


I expected to see bigger results for localizing Picross HD into German and French.  I would love to hear back on what other people have experienced when localizing into German and French.   Are these results typical?  Is English just not an issue in those countries for people using iOS devices for puzzle style gaming?

Japanese

We have had great growth in Japan sense we localized.  Japanese New User acquisition is allmost an order of magnitude greater then all other locals combined.  And it continues to grow.  I want to say thank you to all our new Japanese users.


Why the great growth?  Well for starters, I believe Picross as a game style is better know in Japan then it is in other parts of the world.  We also totally overhauled the Keywords for Japanese.  We used keywords that would be meaningfully for the Japanese people.  Even with all that, this totally exceeded my expectations.

iPhone vs iPad

Almost all of our games are Universal apps, and we usually see close to 50/50 spread across iPhone and iPad usage.  For example, in Germany about 55% of Picross HD sessions are run on an iPad.  However, in Japan that number is about 4%.  We where surprised about that difference.  What have other people seen for iPhone vs iPad usage of their apps in different locals?

What's Next

We want to continue to experiment with different locals.  The next version of Picross HD, which is pending Apple approval, will include support for Korean.  We took a similar approach to Korean as we did for Japanese by providing local specific keywords so that should be interesting.

We have also been working on some major updates to Picross HD given its new found growth.  All the puzzles in the next version will have unique solutions and be solvable by logic.  That should help address two of the big feedback items we received from our Japanese users.

We are also looking at how to make the iPhone version even better.   Much of our focus has been on the iPad version, but with this much usage on the iPhone we are going to have to pay even more attention to the iPhone version.

Be sure to give Picross HD a try and let us know what you think.  It's a free download. :)

Thanks,
Tod and Ken
Five Lakes Studio, LLC

Monday, February 27, 2012

Picross HD Localization

At a Mobile Mondays meeting in Ann Arbor, Michael Antaran founder of Marvel Apps, was talking about the benefits of localizing AppStore Apps.  That was enough to inspire me to give it a try.  I spent the last week localizing Picross HD, our best revenue generating App so far, and I thought I would share my experiences thus far.

Languages

Using some metrics and based on the appeal of Picross HD, the first thing I decided was to localize in 3 languages: German, French, and Japanese.


Contractors

We used odesk to find the people to do the localization and that has been a very good experience.  It was really easy to find people to do French and German.  It was a little harder finding someone to do a good job on Japanese. However, everyone we ended up working with was responsive, quick, affordable, offered good advice, and did an all around great job.  It took about a week to get all 3 translations completed.

How to Localize

Before I connected with the odesk people, I first needed to figure out how we wanted to approach the actual localization and how to get the strings extracted.  A great reference for this is on Ray Wenderlich's blog in a Localization article by Sean Berry.  I wanted to keep the localization really simple as I didn't want the odesk people to have to have special tools such as resource editors.  So I put all the strings into a few files I could send to them:
  • description.rtf - Containing the app store description
  • help.rtf - Text for the app help
  • Localizable.strings - App strings, Game Center Leader board Strings, and in-app store strings
I put some extra strings in the Localizable.strings even through they aren't directly used by the App such as the Game Center Strings and in-app store strings.  This just made it easier to communicate with odesk and gave me a good place to manage the strings over time.

I gathered strings from a few different places:
  • From XML puzzle files - Using a XSLT transform (this was a majority of the strings).  The name of each puzzle needed to be localized and we have over 400 puzzles in Picross HD.
  • From each XIB (resource) file - I did this manually.  I didn't want the contractors to have to deal with a resource editor so I just manually added the UILabel and UIButton text into the Localizable.strings file.
  • Look for hard coded strings in the app and added the NSLocalizedString(@"english text", nil) macro for each string needing translation.
Strings coming from a resource file won't automatically lookup their translation via Localizable.strings.  The resource files assume you will localize each resource file separately which I didn't want to do.  So I just added some simple code to the UIViewControllers of each xib that needed to be localized:

- (void)viewDidLoad
{
    [super viewDidLoad];
 
    // Localize the labels in this view
    //
    for( id foundView in self.rateThisPuzzleButtonView.subviews )
    {
        if( [foundView isKindOfClass:[UILabel class]] )
        {
            UILabel *label = foundView;
            label.text = NSLocalizedString( label.text, nil );
        }
    }
}

In order to do the buttons, I decided to just do those manually as I didn't have that many buttons to do:
    [self.puzzleSuccessTryAgainButton setTitle:NSLocalizedString([self.puzzleSuccessTryAgainButton titleForState:UIControlStateNormal],nil) forState:UIControlStateNormal];
    [self.puzzleSuccessNextButton setTitle:NSLocalizedString([self.puzzleSuccessNextButton titleForState:UIControlStateNormal],nil) forState:UIControlStateNormal];

I also had to adjust the font and/or button sizes in order to accommodate the length of the German text.  This was a little tricky given how some of our buttons worked.  I ended up doing a StackOverflow posting once I figured out how to solve button text wrapping issues.

Lessons Learned

Doing three languages at once was a bit much for the first time trying to localize an app. It would have been better to start with just one language.  There where several mistakes I made that required me to add more work on the localization teams.  Every time I did this, I had to communicate  back with 3 different people and it was just more work then getting it right the first time.  The types of mistakes I made where:

  • When I sent the strings to the localization teams I didn't realize I was missing about 50 puzzles.  The XSLT transform I wrote missed some puzzles.
  • I should have sent screenshots to the localization team up front as they didn't have enough context to do some of the translations.  They ended up doing some redo work once I sent them the screenshots.
  • I often use images for the help screens, but I was missing the original layered image for one of the help screens.  I ended up spending a few hours recreating a help screen so I could replace the text easily.  Save your original layered artwork (especially if it has text in it).
  • Images with text == pain.  I knew this before, but zero thought had went into the idea we might localize this App when we first wrote it over a year ago.  To help this, I wrote some code to dynamically load a localized version of an image file based on the active language.
Overall, this was a very easy effort.  It only took about a week of my part-time schedule to go from nothing localized to having three languages and ready for posting to the AppStore.  Apple's tools and handling of fonts and languages works great.


Next Steps

This just got released to the AppStore so wish us luck.  I will report back when we know more how this experiment went.  Ken and I are hoping to see a noticeable uptick and we hope more people enjoy Picross HD in their native language.

Be sure to give Picross HD a try and let us know what you think.

Thanks,
Tod and Ken
Five Lakes Studio, LLC