I learned an interesting lesson this weekend. I was reviewing our AppStore financial results and I noticed an interesting entry:
After a little bit of research, I learned Apple withholds a 20% tax on Japanese sales. In order to eliminate this tax, you need to file some tax forms with the Japanese government and US government. Apple helps with this process by providing and submitting the forms.
David Smith has a nice article on "Understanding Japanese App Store Withholding" that goes into more detail.
I filled out the forms this weekend (8/26/2012), and I will report back on when it takes effect. I would love to hear about year experiences with this process.
Monday, August 27, 2012
Monday, August 13, 2012
Subversion to Git
A couple weeks ago Ken and I decided to make the plunge from Subversion to Git. The main catalyst for this was some Hype generated files I wanted to check into Subversion. Unfortunately, every time you generate the HTML for a Hype project it blows away the folder structure, which removes the .svn folder and gets subversion all confused. I understand there are newer versions of Subversion that resolve that issue, but I decided to just do the switchover to Git given that's where it seems most people are going today.
Given Ken and I work together on projects we need a version control hosting provider. We currently use Beanstalk for subversion, and we have been very pleased with them. However, I decided to take a look at the available options. I took a serious look at GitHub and Bitbucket. I opted to go with GibHub for our main git repository. I really liked its interface and how it links your personal account to your corporate account. Plus it has a big user following. Several reviews I read also talked about GitHub being more performant and a step ahead of Bitbucket. However, that info could be a bit dated by now.
We opted for GitHub's $25 per month plan for 10 private repositories. However, I also created a Bitbucket account as they have free unlimited private repositories. I'm using bitbucket to host paid for 3rd party assets, and I'm using GitHub for our source.
While lots of people use the command line to manage Git, I prefer having some nice GUI tools for my day to day work. There are several tools out there, but I ended up going with SourceTree. It seems to be the most complete tool for managing subversion repositories. I also used GitHub's tool for awhile to get up and started, but SourceTree feels like a more complete and powerful solution.
I decided not to do a full history migration from Subversion to Git. I opted to just migrate the latest revision. We are a small shop, and it sounded like more trouble then it was worth to preserve the entire history.
I still made a big mistake though. I just took all our source and added it to Git, just like it was setup in subversion. We have over 1.5 GB of source including game assets such as images, sounds, and puzzle data. This is when I learned that GitHub doesn't recommend repositories over 1GB.
I learned firsthand how painfully slow it was to pull down a new large repository, and I was also worried that we would get flagged by GitHub for having too large of a repository. I also found I would occasionally get an error downloading the new repository and would have to start over.
The solution was to breakup the old subversion repository into several smaller repositories and submodules. I haven't had any issues with these smaller repositories.
I decided to break up the old single subversion repository into several smaller repositories. Each iOS app we make has its own GIT repository, and we use submobiles for shared components.
This is an example of the submodules used for Hashi, a new App we are working on.
What's nice about using submodules is that the parent project references an explicit revision of the submodule. So if a submodule is updated in a different project, it won't break the current project. This allows you the time to upgrade the project at your own connivence.
One thing we learned is that you have to be a little careful when adding a submodule to your project through SourceTree. By default SourceTree was adding the user's login to the submodules URL. This of course causes issues for other people trying to work with the submodule.
You just need to remove the user's login from the URL. If you forget, you can manually change the .git/config to reference the correct submodule URL.
It took me a weekend or two before I started to understand Git. I'm still far from an expert, but I am getting more comfortable with it. One of the sites that really helped was from Mark Lodato and his Visual Git Reference. Stuart Ellis also has a really nice basic getting started guide to using Git. And finally the must read Git Reference on Branching and Merging.
Please feel free to follow me on twitter at @fivelakesstudio. I would love to hear about your experiences on using or switching to Git. Let me know if you found this useful.
Thanks for reading and be sure to visit us at Five Lakes Studio.
Picking a Hosting Provider
Given Ken and I work together on projects we need a version control hosting provider. We currently use Beanstalk for subversion, and we have been very pleased with them. However, I decided to take a look at the available options. I took a serious look at GitHub and Bitbucket. I opted to go with GibHub for our main git repository. I really liked its interface and how it links your personal account to your corporate account. Plus it has a big user following. Several reviews I read also talked about GitHub being more performant and a step ahead of Bitbucket. However, that info could be a bit dated by now.
We opted for GitHub's $25 per month plan for 10 private repositories. However, I also created a Bitbucket account as they have free unlimited private repositories. I'm using bitbucket to host paid for 3rd party assets, and I'm using GitHub for our source.
GUI Tools
While lots of people use the command line to manage Git, I prefer having some nice GUI tools for my day to day work. There are several tools out there, but I ended up going with SourceTree. It seems to be the most complete tool for managing subversion repositories. I also used GitHub's tool for awhile to get up and started, but SourceTree feels like a more complete and powerful solution.
Migration
I decided not to do a full history migration from Subversion to Git. I opted to just migrate the latest revision. We are a small shop, and it sounded like more trouble then it was worth to preserve the entire history.
I still made a big mistake though. I just took all our source and added it to Git, just like it was setup in subversion. We have over 1.5 GB of source including game assets such as images, sounds, and puzzle data. This is when I learned that GitHub doesn't recommend repositories over 1GB.
I learned firsthand how painfully slow it was to pull down a new large repository, and I was also worried that we would get flagged by GitHub for having too large of a repository. I also found I would occasionally get an error downloading the new repository and would have to start over.
The solution was to breakup the old subversion repository into several smaller repositories and submodules. I haven't had any issues with these smaller repositories.
Submodules
I decided to break up the old single subversion repository into several smaller repositories. Each iOS app we make has its own GIT repository, and we use submobiles for shared components.
This is an example of the submodules used for Hashi, a new App we are working on.
What's nice about using submodules is that the parent project references an explicit revision of the submodule. So if a submodule is updated in a different project, it won't break the current project. This allows you the time to upgrade the project at your own connivence.
One thing we learned is that you have to be a little careful when adding a submodule to your project through SourceTree. By default SourceTree was adding the user's login to the submodules URL. This of course causes issues for other people trying to work with the submodule.
You just need to remove the user's login from the URL. If you forget, you can manually change the .git/config to reference the correct submodule URL.
Conclusion
It took me a weekend or two before I started to understand Git. I'm still far from an expert, but I am getting more comfortable with it. One of the sites that really helped was from Mark Lodato and his Visual Git Reference. Stuart Ellis also has a really nice basic getting started guide to using Git. And finally the must read Git Reference on Branching and Merging.
Please feel free to follow me on twitter at @fivelakesstudio. I would love to hear about your experiences on using or switching to Git. Let me know if you found this useful.
Thanks for reading and be sure to visit us at Five Lakes Studio.
Monday, July 2, 2012
Hype - How To Play
Ken and I have been struggling with the problem of how to teach people to play our games. Most of our games are fairly niche, and we would like to broaden their appeal to people who might not know how to play.
We wanted something that would accomplish the following goals:
What we ended up with was a how to play integrated tutorial that was implemented with an imbedded WebView that plays back HTML 5 generated via Hype. That was a mouth full. Good thing we have a video showing it in action:
Using Hype, you can create HTML 5 web content with animations and interactive content. The best part is it creates really small output as it just requires the art assets and some generated javascript to control the animations.
There are just a view basic types of object you can use in Hype such as Box, Text, Button, ...
I wish Hype had Arrows and other nicer callout objects build into it. However between the art assets I already had and using Snagit for the other assets, I was able to put together what I needed.
I was actually able to simulate gameplay just by using these basic Hype elements and its Key framing capability. It only took one evening to finish the Hype project. I thought about using something like Camtasia to record a video of some of these parts as opposed to rolling the play animations by hand. However, I wanted the output really small and it wasn't that hard to simulate the effects I needed. However, given you can embed video in Hype it would be interesting to try it with embedded video clips.
You can easily generate the HTML assets for the Hype project. It just produces a simple "main" html file and a folder containing the Javascript, Images, and other resources needed to run the project.
Given this is just HTML, you can even upload it to a website and interact with it directly in a browser:
We just took these generated assets and added them to our iOS project so they would be built into the resource bundle. If you do add it to your project, be sure to include it as a folder reference so xcode will preserve the folder layout in the resource folder. Otherwise, it will get flattened into a single folder which could cause issues.
You load resource based files into the WebView just like you would load any local file. Here is some example code that loads the above example:
NSString *howToPlayDevice = [FLUtil iPad] ? @"iPad" : @""; NSString *resourcePath = [[NSBundle mainBundle] resourcePath]; NSString *howToPlayPath = [NSString stringWithFormat:@"%@/html/HowToPlay%@.html", resourcePath, howToPlayDevice]; NSURL *url = [NSURL fileURLWithPath:howToPlayPath]; NSURLRequest *requestObj = [NSURLRequest requestWithURL:url]; [self.howToPlayWebView loadRequest:requestObj];
One final tip, make sure the canvas in Hype is the same size as the WebView so it fits perfectly with no scaling or borders. That's all there is to it.
One of the requirements was for us to be able to measure the effectiveness of this effort through Flurry. In order to do that, we need to be able to communicate from the HTML Webview into the Objective-C code.
Alexandre Poirot has a nice article on How to Properly Call ObjectiveC From Javascript. I didn't need to use his entire framework, but I used the basic concept to allow Hype's Javascript to be intercepted by the WebView's delegate.
In Hype, I setup a Javascript function to post to a special URL that can be intercepted by the shouldStartLoadWithRequest UIWebView delegate.
I used a custom URL scheme called "howtoplayscene" and passed Hype's current scene name so I can tell what scene the user is viewing. By doing this in an iframe that we create and then destroy it so the user doesn't see anything. Plus, we can use the same HTML for the embedded WebView as well as a regular browser. Although, there won't be any tracking when running in a regular browser.
Once the javascript is in place, each scene can then be configured to call the trackHowToPlayCreentScene function when it's loaded:
That's all there is to it on the Javascript side. The Objective-C side is fairly straightforward:
With this in place, we will get custom events in Fluury that look something like:
The other little trick I use, as seen above, is when the user complets the How To Play tutorial. I have the HTML navigate to "http://www.fivelakesstudio.com/Five_Lakes_Studio/PicrossHD.html". I picked that URL so when the user hits the done button they will be taken to the webpage for PicrossHD, when run from an external browser. However, when run from within the App, we close the UIWebView.
This will go live soon, and we are excited to get this in the hands of our new users. I hope we can teach more people how to Play Picross HD and hopefully they will like it.
Please feel free to follow me on twitter at @fivelakesstudio. I would love to hear about your experiences on how to onboard people to your app. Let me know if you found this useful, and especially if you now understand how to play Picross HD.
Thanks for reading and be sure to visit us at Five Lakes Studio. I should mention that I also work for Techsmith, the makers of Snagit and Camtasia.
We wanted something that would accomplish the following goals:
- Quickly teach the players the basics of game play
- Look integrated into the app
- No download or streamed content
- Measurable
- We don't want to inflate the App size too much
- Something we can create without too much custom programming
What we ended up with was a how to play integrated tutorial that was implemented with an imbedded WebView that plays back HTML 5 generated via Hype. That was a mouth full. Good thing we have a video showing it in action:
Hype
Using Hype, you can create HTML 5 web content with animations and interactive content. The best part is it creates really small output as it just requires the art assets and some generated javascript to control the animations.
There are just a view basic types of object you can use in Hype such as Box, Text, Button, ...
I wish Hype had Arrows and other nicer callout objects build into it. However between the art assets I already had and using Snagit for the other assets, I was able to put together what I needed.
I was actually able to simulate gameplay just by using these basic Hype elements and its Key framing capability. It only took one evening to finish the Hype project. I thought about using something like Camtasia to record a video of some of these parts as opposed to rolling the play animations by hand. However, I wanted the output really small and it wasn't that hard to simulate the effects I needed. However, given you can embed video in Hype it would be interesting to try it with embedded video clips.
HTML
You can easily generate the HTML assets for the Hype project. It just produces a simple "main" html file and a folder containing the Javascript, Images, and other resources needed to run the project.
Given this is just HTML, you can even upload it to a website and interact with it directly in a browser:
Loading WebView From Resource
Measurable
- HowToPlay.Scene.Goal
- HowToPlay.Scene.Tool Bar
- Show HowToPlay.Scene.Step 1
- Show HowToPlay.Scene.Step 2
We will be able to track how many users make it through all they steps and which percentage of users drop off at any given point in time. Hopefully, with this information we can help make the tutorial better and find where and if users are getting stuck. We will also be able to correlate information such as the percentage of people that complete the tutorial that go on to purchase.
Conclusion
This will go live soon, and we are excited to get this in the hands of our new users. I hope we can teach more people how to Play Picross HD and hopefully they will like it.
Please feel free to follow me on twitter at @fivelakesstudio. I would love to hear about your experiences on how to onboard people to your app. Let me know if you found this useful, and especially if you now understand how to play Picross HD.
Thanks for reading and be sure to visit us at Five Lakes Studio. I should mention that I also work for Techsmith, the makers of Snagit and Camtasia.
Monday, June 18, 2012
Engage Users In-App
Ken and I have been trying to figure out how to better engage and communicate with our users. The AppStore sure doesn't make it easy.
We have tried to use GetSatisifaction and of course there is classic e-mail, but they both have the problem of discoverability. We don't have a good spot in App to make those resources available without disrupting the user experience. By forcing users to leave the app and visit our website to communicate with us, we averaged only a few contacts a month.
We also prompt for star ratings within the app and that has been helpful in getting reviews, and we appreciate and read the review feedback. However, it's really frustrating when you can answer the persons question or problem with no way to actually get the answer to them.
I happened to find a nice solution to this problem. The Appsfire App Booster SDK for iOS and Android is designed to help with in-app engagement. It's still in Beta, but we have been using it for Picross HD, and its been great. We now receive feedback a couple times a day from our users, and we are able to respond back to them directly.
They even include a little helper class that takes care of creating the badge for you. We chose to do a custom integration because we have a game style UI.
We hooked up notifications for message changes so that badge can be updated correctly, and when the little message bubble is pressed we launch the Appsfire messaging interface. That's all you have to do on the client side and you can start engaging your users. I would be happy to share the code we use for this, just send me a tweet.
They have options for changing the color scheme, but the default color scheme worked well for us.
The UI is also supposed to be localized in several languages including German and Japanese. However, we were have never able to confirm that it is indeed localized. I can say that we have many Japanese users that have sent us feedback through Appsfire.
The e-mail field is optional. We have found most users do provide an e-mail address. When the feedback is sent, you will get an e-mail that allows you to respond either within the app or via an e-mail (assuming the user provided an e-mail address).
We usually try to answer the user via the "Notification Wall" aka in-app. However, if the response is long or under special circumstances we will reply via e-mail. For example, one user felt strongly about an issue and vowed to never launch the app again. I wanted to thank the user for their feedback and reach out to them. Doing it in-app wouldn't have been effective assuming they weren't going to open the app again so I used e-mail. The user thanked me for reaching out to him and hopefully he gave us another chance.
We think this is a great way to expose users to features or capabilities of our app that they may not know about. When creating custom message you can also specify the message in different languages such as German and Japanese.
Here are some of the improvements I hope they make as they continue to develop the SDK
The team over at Appsfire is very professional and helpful, and I can't say enough nice things about them and their offering.
We have tried to use GetSatisifaction and of course there is classic e-mail, but they both have the problem of discoverability. We don't have a good spot in App to make those resources available without disrupting the user experience. By forcing users to leave the app and visit our website to communicate with us, we averaged only a few contacts a month.
We also prompt for star ratings within the app and that has been helpful in getting reviews, and we appreciate and read the review feedback. However, it's really frustrating when you can answer the persons question or problem with no way to actually get the answer to them.
I happened to find a nice solution to this problem. The Appsfire App Booster SDK for iOS and Android is designed to help with in-app engagement. It's still in Beta, but we have been using it for Picross HD, and its been great. We now receive feedback a couple times a day from our users, and we are able to respond back to them directly.
Getting Started
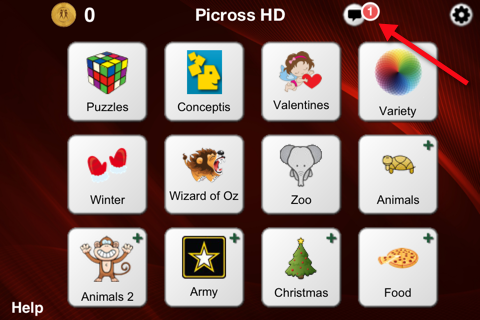
First off, we carved out a little space in the UI to put in a messaging button and indicator. Appsfire has several recommendations for this so it has enough visibility within your app. We chose to put it at the top of our main puzzle screen to the right of our App name:| Message Button With Message Badge |
We hooked up notifications for message changes so that badge can be updated correctly, and when the little message bubble is pressed we launch the Appsfire messaging interface. That's all you have to do on the client side and you can start engaging your users. I would be happy to share the code we use for this, just send me a tweet.
In-App Messaging
Appsfire includes a built-in messaging engine. Your users can send you messages, and you can reply to them directly within the app.
They have options for changing the color scheme, but the default color scheme worked well for us.
The UI is also supposed to be localized in several languages including German and Japanese. However, we were have never able to confirm that it is indeed localized. I can say that we have many Japanese users that have sent us feedback through Appsfire.
The e-mail field is optional. We have found most users do provide an e-mail address. When the feedback is sent, you will get an e-mail that allows you to respond either within the app or via an e-mail (assuming the user provided an e-mail address).
We usually try to answer the user via the "Notification Wall" aka in-app. However, if the response is long or under special circumstances we will reply via e-mail. For example, one user felt strongly about an issue and vowed to never launch the app again. I wanted to thank the user for their feedback and reach out to them. Doing it in-app wouldn't have been effective assuming they weren't going to open the app again so I used e-mail. The user thanked me for reaching out to him and hopefully he gave us another chance.
What's New
Another feature we use is What's New. The Appsfire server will automatically detect new App releases, and it can automatically notify your users of the update.Tips and Tricks
We are planning to release a series of tips and tricks for our users. So far we have released one tip, and it has been well received. The Appsfire portal provides metrics on views and clicks for each message so you can measure their effectiveness.We think this is a great way to expose users to features or capabilities of our app that they may not know about. When creating custom message you can also specify the message in different languages such as German and Japanese.
Link to Web Content
In additional to static message, you can link to web content either displayed within the app or via the Safari app (on iOS). We use this for inviting people to join your twitter account and are experimenting with other creative uses such as linking to a youtube help video.App Promotion
App promotion is another option available via the Appsfire SDK. We use it in Picross HD to promote Kento and vice-versa.
When the user clicks on an App promotion message they are taken directly to the AppStore.
Badge Updates on Launch Pad
A new feature they just added was the ability to update the badge on the Launch Pad without having to run the App. This is a great way to help pull people back into the app.Conclusion
I highly recommend the Appsfire App Booster SDK, and it is in Beta!! It still has some rough edges, but even in its Beta form I consider it a must have for Picross HD because of how it allows us to connect with our customers and create a more engaging experience.Here are some of the improvements I hope they make as they continue to develop the SDK
- The web portal for managing messages is a little rough around the edges.
- Setting the start and end dates for a message didn't work as expected.
- It was challenging getting push badge notification to work and needed Appsfire support. I expect this will get better. It desperately needs debug tools.
- Doesn't work behind some firewalls
- The in-app messaging interface doesn't work behind some firewalls
- Feature Request: Only the welcome message allows you to provide "longer" text without having to use a web page. It would be nice for tips and tricks to have a custom message with longer text.
- Feature Request: I would love the ability to time message deliver based on days since installing the app (or other in-app usage). Right now all messages are date/time delivered.
The team over at Appsfire is very professional and helpful, and I can't say enough nice things about them and their offering.
Please feel free to follow me on twitter at @fivelakesstudio. I would love to hear about your experiences connecting and engaging with your users. Let me know if you found this useful.
Wednesday, June 6, 2012
AB Testing - Results
In Part 1 I talked about how we are adding interstitial ads into Picross HD. We had been getting tips and suggestions on how to do this in a way that doesn't drive our users crazy. We decided to put together an AB Testing framework so we could learn from the results, and this is the results of that experiment.
This is a bit concerning to us as we only do an InterstitialShow when a session starts. That means almost half our users are exiting the app right after they started the app. Unfortunately, flurry doesn't let us track this by event so I can't tell how it compares across ad vendors. I'm still not exactly sure what this really means for the app's performance as I haven't see it negatively effect the number of sessions or time spent in app.
Interstitial Ad Providers Test
One of the tests we conducted was on interstitial Ad providers. We went with 2 different providers: ChartBoost and PlayHaven. These ads are displayed on launch of the application and half our users got ChartBoost and the other half got PlayHaven ads.
![]() |
| Ads Shown |
Even though ChartBoost showed only 2% more ads, it generated 8% more clicks.
![]() |
| Ad Clicks |
In addition, it turns out ChartBoost also produced significantly more revenue.
I plan on continuing to work with PlayHaven to see if we can improve the results. They have been great to work with, and I think they can do better.
The spike on the 29th was caused by two things at once. The first was a one day promotion on AppsFire, and the second was we become more agressive on showing ads.
Agressive, Normal, or Lax Ads
Another experiment we wanted to run was to determine how often we should show ads. We really didn't want to piss off our customers, and we weren't sure what the reaction would be. It's rather difficult introducing ads into a product that didn't have any ads to begin with.
We tested 3 different configurations: Agressive, Lax, and Normal. Each configuration had about the same level of distribution.
"Time Between Shows" is the minimum time that has to pass before we show another ad. For example, the agressive configuration won't show ads more then once every 5 minutes. In the Lax case, we where only showing an ad every day.
We also didn't want the user's first experience in launching the app to be an ad. So we used a "Sessions Before Active" configuration. In the case of agressive, we require the app to have 2 sessions before showing an ad.
We then looked to see what effects this had on our app usage. The Lax time was the closet measure we had to no ads, and it basically matched what we had seen before introducing ads.
![]() |
| Time in App with Lax Ad |
Our takeaway was that we weren't seeing a significant shift or loss of time spend in app. Actually, you could argue the time spent in app actually improved a little bit.
![]() |
| Time in App with Normal Ad |
We also found it interesting that there was no significant difference between Normal and Lax ads.
![]() |
| Time in App with Agressive Ad |
Our AB Test framework allows us to adjust tests daily. Using that capability, we pulled the Lax ads configuration on May 29th, and we may soon go to just showing Agressive Ads. The one thing holding us back is sessions end almost 50% of the time after seeing an interstitial add!!
Ad Feedback
We have had several negative responses to the ads. However, it hasn't negatively effected our overall star rating or time spent in app. Some of the complaints we received include:
- Too easy to miss click on the ad
- Video Ad consuming download bandwidth not appreciated (we also use AdColony for video ads).
- Ads being introduced in a paid for app. Picross HD use to be a paid app a long time ago.
That last one was interesting because we don't show ANY still ads if any puzzle pack has been purchased, and we never show ads in the paid puzzle packs. However, we show video ads in the "free" puzzle packs. We are going to change this so that if any puzzle pack has been purchased we won't show any ads. I think it was just too confusing for users the other way.
Conclusion
This has been an exciting experiment. The data is telling us we should just go with agressive ads and use ChartBoost as our ad provider. I'm still not comfortable pulling the agressive switch as I want to hear from more customers, and PlayHaven has been such a good group of people to work with I would like to see if they can perform better.
If we can make this model work, we would like to add more ad supported content in Picross HD.
Please feel free to follow me on twitter at @fivelakesstudio. I would love to hear about your experiences with ads and A/B Testing. Also feel free to contact me if you would be interesting in finding out more about our iOS AB Test framework.
Thanks for reading and be sure to visit us at Five Lakes Studio.
Monday, May 21, 2012
Mobile Website (dudamobile.com)
OMG. Five Lakes Studio is a mobile casual game company, but we had no mobile website. What's even worse is a majority of our traffic is coming from mobile devices (surprise!!!):
How did we get here?
We don't get much traffic to our website, and we don't want to spend a lot of time on it. We focus our business on our users and our apps. For example, we just integrated AppsFire's AppBooster SDK into Picross HD so users can contact us and we can communicate with them directly within the App. I plan on writing a blog post just about it. So far the results are looking promising. However, you have to have a website.
While we could hand code HTML, we ended up using iWeb. Our pages are mostly static, and we wanted something that was fast to create and gives us creative control (not ridged templates). When we first launched Euchre HD we had some user complaints because they didn't understand how to setup Game Center. I was able to quickly (minutes) create and post visual step by step instructions on how to do this by using iWeb and Snagit.
The downside with iWeb is it doesn't help with the creation of a mobile website, and the HTML produced isn't well suited for mobile. Also, I'm not sure what the future of iWeb is going to be. I think it is an amazing tool and I wish Apple was doing more with it.
What are we to do?
I started searching for a mobile website creation tool. I ended up finding an interesting online/hosted solution from dudamobile.com. They have an ad supported model and a paid model ($9.00/month). The paid model also supports connecting to your domain so now we have m.fivelakesstudio.com.
Getting Started
Its very easy to get started. Dudamobile walks you through setting up a new site. You can pick from several themes. The nice thing is you aren't locked into a theme. During editing you can customize the page headers, footers, background, colors, layout, and so much more.
You can interact directly with a preview of a page and choose from many highly customizable interesting drag and drop widgets:

I haven't tried syncing content. Most of the content we have is fairly static so I turned it off. Plus I am doubtful syncing will work well with iWeb, but I might be surprised again.
Please feel free to follow me on twitter at @fivelakesstudio. I would love to hear how others have solved their mobile website needs.
I hope this was useful. Please visit our site and try out our games for iOS.
You can interact directly with a preview of a page and choose from many highly customizable interesting drag and drop widgets:

My favorite widget is the Image Slider. You can add up to 3 images in a slider style control. You can see it above in the preview (currently showing Kento).
Page Import and Syncing
One of the nice things about dudamobile is that it can import and sync to your existing website. When you add a page, you can give it the URL to one of your existing pages. It will then important the page. I was surprised this even worked for iWeb sites. I did have to do some basic cleanup and reformatting on the imported content. It was mostly deleting extra stuff I didn't want in the mobile site.
I haven't tried syncing content. Most of the content we have is fairly static so I turned it off. Plus I am doubtful syncing will work well with iWeb, but I might be surprised again.
Support
I was impressed with the dudamobile support staff. I had some issues getting the slider to work the way I wanted. They where very responsive and helpful.Conclusion
It has only been live for about a week and so far I am pleased with how this turned out. I still need to setup redirects on all the web pages to redirect to the mobile website. Currently, only the main page has a redirect.Please feel free to follow me on twitter at @fivelakesstudio. I would love to hear how others have solved their mobile website needs.
I hope this was useful. Please visit our site and try out our games for iOS.
Tuesday, May 8, 2012
ABTesting
We are looking at adding interstitial ads into Picross HD. We have been talking to people on the subject trying to get tips and suggestions on how to do this in a way that doesn't drive our users crazy and yet allows us to gain some additional revenue that we can use to keep making our games better.
One point that kept being made was to use AB Testing for figuring out how to optimize what we are trying to do. This of course can be applied to many more things then ads, but I finally had a real need to solve this ABTesting problem.
The Problem
I wanted a simple ABTesting platform that would allow me to do the following:
We use a simple XML file to define the test cases we want to experiment with. Here is a simple example of the XML definition we use:
<ABTest>
<testset name="AdTime">
<casedef name="Normal" weight="33"/>
<casedef name="Agressive" weight="33"/>
<casedef name="Lax" weight="33"/>
<vardef key="minTimeBetweenInterstitials">
<case name="Normal" value="10.0"/>
<case name="Agressive" value="5.0"/>
<case name="Lax" value="1440"/>
</vardef>
<vardef key="numStartsBeforeShowingInterstitials">
<case name="Normal" value="4"/>
<case name="Agressive" value="2"/>
<case name="Lax" value="10"/>
</vardef>
</testset>
</ABTest>
This was developed so that we could have multiple test sets and run multiple ABTests at the same time. The example above just defines a single test set.
With a test set, we can define multiple test cases we want to evaluate and we can define a frequency or weighting used to determine the percentage of users/devices that should be assigned that test case. In addition, each test set can have multiple variables and each variable can have values for each test case.
We wrote a simple objective-c class that manages the loading of the XML and provides a simple interface for reading variables from the ABTest.
@interface FLABTestManager : NSObject
+ (FLABTestManager *)defaultManager;
- (void)activateABTest;
- (NSString *)stringForKey:(NSString *)key
withDefaultValue:(NSString *)defaultValue;
- (int)intForKey:(NSString *)key withDefaultValue:(int)value;
- (float)floatForKey:(NSString *)key withDefaultValue:(float)value;
- (bool)boolForKey:(NSString *)key withDefaultValue:(bool)value;
@end
Once activated, the App will randomly pick a test case by weight for each test set defined. It should be noted that once picked, the app will keep using the same test case even if the app quits. This effectively locks a device into a particular test. If the app is uninstalled and reinstalled a new test case may get chosen.
We choose to only activate the test cases from within applicationDidBecomeActive so we only activate once per session. This is because it is possible to have a different configuration chosen during activation (see Changing Tests) and for reporting/tracking purposes we don't want to mix test cases (see Tracking/Reporting).
In order to read a variable under test, simple accessors methods are provided. For example: If we where configured for Agressive Ad display and we had the XML definition above then the variable minTimeBetweenInterstitials would return "5.0":
We supply a default value for the case when the test hasn't been activated or if there was a problem determining the value.
We wanted the ability to change tests without having to republish the App. This allows us to refine settings as we learn. In order to do this, a copy of the XML is stored and retrieved via a GoogleAppEngine service.
When an app doesn't have an AB Test loaded, it just uses the built in XML definition and a request is made to the web service for an updated version. If there is an updated version, it will be downloaded and kept ready for the next ABTest activation.
When a new, downloaded, version of the ABTests are found the app will adjust to the new values accordingly. For example if the apps current test case is no longer available in the XML definition, it will just pick a new test case.
Whenever activateABTest is called we log events to Flurry for the active test cases. For example if the above XML definition is used and the device chooses Agressive for AdTime then the following two events would be logged:
AdTime <== with parameter of Agressive
AdTime.Agressive
This is enough information to allow us to create a segmentation on "AdTime.Agressive" so we can see how it compares with other tests. We also log "AdTime" as an event by itself with the parameter set to the test case picked so we can validate the distribution of test cases.
We are still finishing testing on this new framework and we hope to submit to the AppStore next week. I think this has some nice potential to allow us to do more ABTesting on the work we do in order to improve the user experience of our products. I will report back on our findings.
If you would be interesting in using this framework, just let me know. I can't really hook you up with the GoogleAppEngine side of things, but I would be happy to share what I can on the iOS side.
Please feel free to follow me on twitter at @fivelakesstudio. I would love to hear how others have solved this AB Testing issue.
I hope this was useful. Please try out Picross HD and our other puzzle games for iOS.
One point that kept being made was to use AB Testing for figuring out how to optimize what we are trying to do. This of course can be applied to many more things then ads, but I finally had a real need to solve this ABTesting problem.
The Problem
I wanted a simple ABTesting platform that would allow me to do the following:
- Test different variables
- Change variables without have to republish the App
- Track / Report on the results
Variables
We use a simple XML file to define the test cases we want to experiment with. Here is a simple example of the XML definition we use:
<ABTest>
<testset name="AdTime">
<casedef name="Normal" weight="33"/>
<casedef name="Agressive" weight="33"/>
<casedef name="Lax" weight="33"/>
<vardef key="minTimeBetweenInterstitials">
<case name="Normal" value="10.0"/>
<case name="Agressive" value="5.0"/>
<case name="Lax" value="1440"/>
</vardef>
<vardef key="numStartsBeforeShowingInterstitials">
<case name="Normal" value="4"/>
<case name="Agressive" value="2"/>
<case name="Lax" value="10"/>
</vardef>
</testset>
</ABTest>
This was developed so that we could have multiple test sets and run multiple ABTests at the same time. The example above just defines a single test set.
With a test set, we can define multiple test cases we want to evaluate and we can define a frequency or weighting used to determine the percentage of users/devices that should be assigned that test case. In addition, each test set can have multiple variables and each variable can have values for each test case.
We wrote a simple objective-c class that manages the loading of the XML and provides a simple interface for reading variables from the ABTest.
@interface FLABTestManager : NSObject
+ (FLABTestManager *)defaultManager;
- (void)activateABTest;
- (NSString *)stringForKey:(NSString *)key
withDefaultValue:(NSString *)defaultValue;
- (int)intForKey:(NSString *)key withDefaultValue:(int)value;
- (float)floatForKey:(NSString *)key withDefaultValue:(float)value;
- (bool)boolForKey:(NSString *)key withDefaultValue:(bool)value;
@end
The XML file is included as a project resource and then within the apps delegate method applicationDidBecomeActive you call activeABTest:
- (void)applicationDidBecomeActive:(UIApplication *)application
{
..
[[FLABTestManager defaultManager] activateABTest];
..
}
- (void)applicationDidBecomeActive:(UIApplication *)application
{
..
[[FLABTestManager defaultManager] activateABTest];
..
}
Once activated, the App will randomly pick a test case by weight for each test set defined. It should be noted that once picked, the app will keep using the same test case even if the app quits. This effectively locks a device into a particular test. If the app is uninstalled and reinstalled a new test case may get chosen.
We choose to only activate the test cases from within applicationDidBecomeActive so we only activate once per session. This is because it is possible to have a different configuration chosen during activation (see Changing Tests) and for reporting/tracking purposes we don't want to mix test cases (see Tracking/Reporting).
In order to read a variable under test, simple accessors methods are provided. For example: If we where configured for Agressive Ad display and we had the XML definition above then the variable minTimeBetweenInterstitials would return "5.0":
[[FLABTestManager defaultManager] floatForKey:@"minTimeBetweenInterstitials"
withDefaultValue:@"10.0"];
We supply a default value for the case when the test hasn't been activated or if there was a problem determining the value.
Changing Tests
When an app doesn't have an AB Test loaded, it just uses the built in XML definition and a request is made to the web service for an updated version. If there is an updated version, it will be downloaded and kept ready for the next ABTest activation.
When a new, downloaded, version of the ABTests are found the app will adjust to the new values accordingly. For example if the apps current test case is no longer available in the XML definition, it will just pick a new test case.
Tracking / Reporting
Whenever activateABTest is called we log events to Flurry for the active test cases. For example if the above XML definition is used and the device chooses Agressive for AdTime then the following two events would be logged:
AdTime <== with parameter of Agressive
AdTime.Agressive
This is enough information to allow us to create a segmentation on "AdTime.Agressive" so we can see how it compares with other tests. We also log "AdTime" as an event by itself with the parameter set to the test case picked so we can validate the distribution of test cases.
Conclusion
We are still finishing testing on this new framework and we hope to submit to the AppStore next week. I think this has some nice potential to allow us to do more ABTesting on the work we do in order to improve the user experience of our products. I will report back on our findings.
If you would be interesting in using this framework, just let me know. I can't really hook you up with the GoogleAppEngine side of things, but I would be happy to share what I can on the iOS side.
Please feel free to follow me on twitter at @fivelakesstudio. I would love to hear how others have solved this AB Testing issue.
I hope this was useful. Please try out Picross HD and our other puzzle games for iOS.
Labels:
idevblogaday
Location:
New Hudson, Lyon Township, MI 48165, USA
Subscribe to:
Posts (Atom)